I’ve always wanted to play around with custom ROMs. Particularly as an android app developer I feel I’m doing myself a disservices by having only ever dealt with stock android. After discovering /e/ I finally decided to take action. I’m writing this document for myself to make the process easier next time, because finding all this info was more of a struggle than I expected. Let’s start at the start:
“I’m going to flash a new ROM to my Android phone.”
ROM = read only memory. Android ROM is essentially another name for the Android operating system (OS).
Flash – Just means installing the OS onto the internal flash memory (an area specially for the OS).
Root – Rooting a device just means getting superuser access which allows you to mess with protected files. The term comes from the linux world which Android is based on. It’s the same concept behind jailbreaking on iOS. We don’t need root access to install a custom ROM.
Back up your phone if you want to keep your data. I’m using a “new” phone (second hand but new to me) so I didn’t worry about it. Steps which delete everything are included below, I didn’t try finding another way.
Of course there are other guides out there, I refereed to a lot of different sources to figure this all out myself, however none of them had a complete step by step process that completely worked for me. I’ve included related links throughout but here are a couple I found most useful:
Video explaining installing Pixel Experience on a Nexus 6p https://youtu.be/7osfPaDxpow?t=213
/e/ how to for installing on a Nexus 5x: https://doc.e.foundation/devices/bullhead/install
This guide is specific to nexus 5x. On my journeys I discovered that while similar, the process is slightly different on each device.
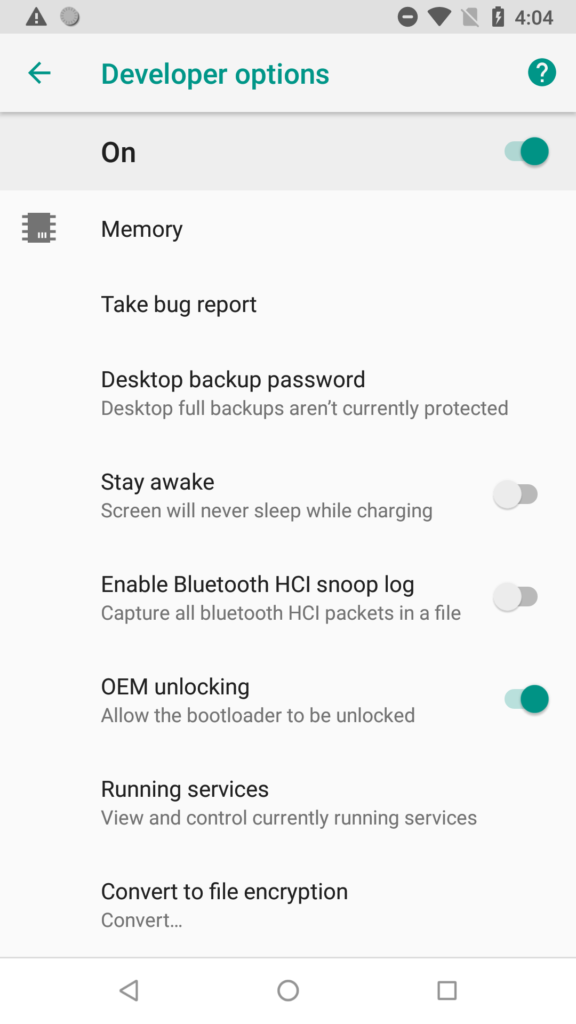
Enable OEM unlocking in developer options (you will also need USB debugging enabled)
This lets you make changes the OEM (Original Equipment Manufacturer) doesn’t support, like installing a custom ROM.
We need ADB and fastboot.
ADB (Android Device Bridge) – allows a desktop to connect to an android device. (https://developer.android.com/studio/command-line/adb)
Fastboot – allows you to run a mode on android independent of the OS where you can install files into flash memory. (https://developer.android.com/things/hardware/fastboot)
Both of these are already in Android Studio so I’ll be using those. They are also part of the platform tools which can be installed separately: https://developer.android.com/studio/releases/platform-tools
Get ADB working in the android studio terminal (can be used from within platform-tools folder but we want it anywhere).
Android studio settings -> appearance and behavior -> System Settings -> Android SDK to find the android sdk location. Then cd to that location. Mine was C:\Users\GGPC\AppData\Local\Android\Sdk but you will need to replace the location in these commands with your own.
cd C:\Users\GGPC\AppData\Local\Android\Sdk
set PATH=C:\Users\GGPC\AppData\Local\Android\Sdk\platform-tools;%PATH%
Test with adb devices (lists the connected devices)
To get into fastboot on the nexus power off then hold power/volume up/volume down at the same time to power on into fastboot mode (much like windows safe mode). (https://android.tutorials.how/boot-into-fastboot-mode/#Google_Nexus)
Or just use this command:
adb reboot bootloader in the terminal
fastboot devices (checks connection is working to plugged in device that is in fastboot mode) (https://www.yrltech.com/2019/01/the-right-way-to-install-minimal-adb.html)
fastboot oem unlock
https://techbeasts.com/how-enable-oem-unlock-android-lollipop-marshmallow/
Use the volume buttons to move up and down and then power button to select YES. (apologies for the smashed screen, this was a second hand test device I had available)

On my first attempt I had problems with device being encrypted. Didn’t know the password so had to reformat using these commands. (https://www.thecustomdroid.com/decrypt-nexus-5x/)
fastboot format userdata
fastboot format cache
Download twrp (https://twrp.me/lg/lgnexus5x.html)
TWRP (Team Win Recovery Project) – allows editing the phones flash memory without messing up the device.
In the same folder as the downloaded file (use cd to navigate and dir to see what files are in that directory. Use the name of your downloaded file in the following commands)
fastboot flash recovery twrp-3.5.2_9-0-bullhead.img
fastboot boot twrp-3.5.2_9-0-bullhead.img
Once you’ve run the command TWRP will start running on the phone where you need to start sideloading as per the following screenshots.


Download the custom ROM you want to install. I tried the following:
Pixel Experience – https://forum.xda-developers.com/nexus-5x/development/pixelexperience-nexus-5x-t3861437
/e/ – https://images.ecloud.global/dev/bullhead/
Choose ADB sideload from menu shown on the phone then use the below command (use the filename of the custom ROM you just downloaded).
adb sideload PixelExperience_Plus_bullhead-10.0-20200606-1514-OFFICIAL.zip (it takes some time so go get a coffee)


Once sideloading completes the back and reboot system buttons will show. Select reboot system. There will be a warning message but don’t worry about that.
DONE. IT WORKS!!!
With the new OS you will have to re-enable developer options in order to connect with your PC and build your apps from android studio onto your device like normal.
Closing thought: it seems I’ll have to repeat most of these steps every time I want to flash a new ROM which is screaming out for a way to automate this into one command.
I don’t have comments on my site but you can reply on Mastodon: https://fosstodon.org/@MonkeyMatt/106634181888108962